In short: To let only people who know a username and password open a folder on your website (a staging site, an admin area or private files), Apache/LiteSpeed servers need just two files: .htpasswd, which stores the users and their hashed passwords, and .htaccess, which switches the protection on. This guide walks you through creating the password file, writing the rules, testing them and fixing common errors.
This method is called HTTP Basic Authentication. The browser sends the password with every request encoded only with Base64, not encrypted (RFC 7617). Always use it on a site that runs over HTTPS; if you do not have a certificate yet, read our SSL certificate article first.
.htaccess works on Apache and LiteSpeed but not on Nginx-only servers (the Nginx equivalent is below)..htaccess file, download a copy before you edit it.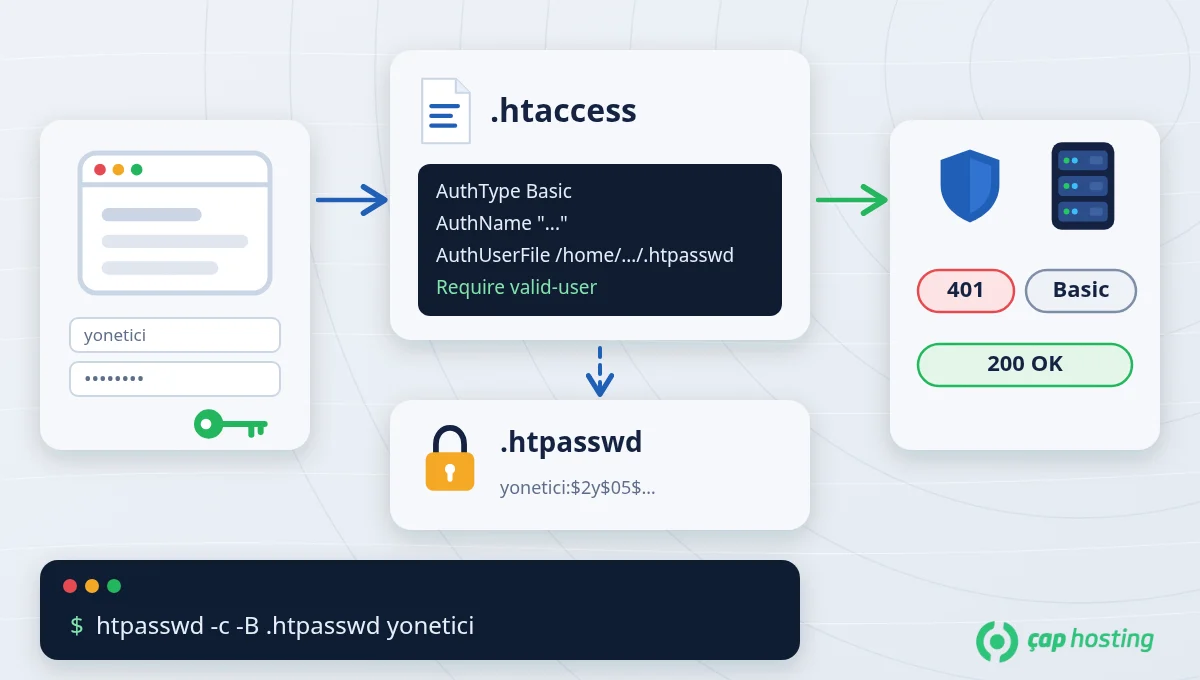
The password file holds one user:hashed-password pair per line. Keep it outside the web root if you can (for example one level above public_html) so it cannot be downloaded from a browser.
If you have SSH access (see our SSH guide to connect), use the htpasswd tool that ships with Apache. When creating the first user, -c creates the file and -B hashes the password with bcrypt:
htpasswd -c -B /home/username/.htpasswd admin
The command asks for the password twice. Do not use -c when adding a second user; it would recreate the file and delete the existing users:
htpasswd -B /home/username/.htpasswd second-user
If you do not have SSH access, you can generate the hashed password on your own computer with OpenSSL (available in the Linux and macOS terminal):
openssl passwd -apr1
Take the value starting with $apr1$, put the username and a colon in front of it and write it as a single line in the .htpasswd file you create in the file manager: admin:$apr1$.... Never write the password in plain text.
Apache needs the full server path of the password file. Over SSH, from your home directory, this command shows it:
pwd
If the output is /home/username, the file path is /home/username/.htpasswd. Without SSH you can usually see your home directory path in the file manager's address bar or in your account details.
Add these lines to the .htaccess file inside the folder you want to protect (create it if it does not exist):
AuthType Basic
AuthName "Restricted Area"
AuthUserFile /home/username/.htpasswd
Require valid-user
AuthName: the realm name that may appear in the password prompt; any text will do.AuthUserFile: the full path you found in Step 2.Require valid-user: allows any user in the file. To limit access to one user, write Require user admin.The protection covers the folder and all of its subfolders. The directives are documented in the Apache authentication guide.
Open the folder's address in a private window; the browser should ask for a username and password. You can also check from a terminal:
curl -sI https://yourdomain.com/protected-folder/ | grep -iE "^(HTTP|www-authenticate)"
You should see a 401 status code and a www-authenticate: Basic realm="Restricted Area" line (see HTTP status codes explained for what 401 means). To try with a password:
curl -sI -u admin https://yourdomain.com/protected-folder/
curl prompts for the password; with the correct one you should get 200.
Adding a password to the wp-admin folder gives you an extra layer against brute-force attempts. However, admin-ajax.php, which many plugins and themes use on the public side of the site, also lives in that folder; locking it completely can break some features (WordPress hardening documentation). Exclude that file in wp-admin/.htaccess:
AuthType Basic
AuthName "Restricted Area"
AuthUserFile /home/username/.htpasswd
Require valid-user

<Files "admin-ajax.php">
    Require all granted
For further measures, see our WordPress security checklist.
Nginx does not read .htaccess; the same protection goes into the relevant location block in the server configuration:
location /protected-folder/ {
    auth_basic "Restricted Area";
    auth_basic_user_file /etc/nginx/.htpasswd;
}
You can use the output of openssl passwd -apr1 for the password file. After the change, test the configuration with nginx -t and reload the service.
| Symptom | Likely cause and fix |
|---|---|
| 500 Internal Server Error | A typo in the directives, or the server does not allow authentication directives in this directory. Check the lines; if it persists, restore the backup and ask for support. |
| The prompt keeps coming back with the right password | The AuthUserFile path is wrong, the file cannot be read or the line format is wrong (user:hash, no spaces). Make sure the password is hashed, not plain text. |
| No password prompt at all | .htaccess is in the wrong folder, the file name is wrong or the server runs Nginx only. Try a private window to rule out browser cache. |
| Existing users can no longer log in | -c was used when adding a new user and the file was recreated. Add the users again. |
Delete the four lines you added (AuthType, AuthName, AuthUserFile, Require) from .htaccess; the change takes effect immediately. To remove a user, delete their line from .htpasswd. If the same file in your site root also contains redirect rules (such as a 301 redirect), be careful to remove only the protection lines.
If you get stuck, open a support ticket and our team will help.
Yes. Search engine bots do not know the password, so they cannot reach protected pages and receive a 401 response; the content is not indexed.
Yes. If you put the protection lines inside a <Files "file-name.pdf"> ... block, the password is requested only for that file.
Basic Authentication has no separate logout button. Closing the browser completely or using a private window ends the session.
Panel tools create the same .htaccess and password file behind the scenes. Whichever you use, test the result with curl or a private window.
 Copyright © 2026 All Rights Reserved

 Turkey (Türkçe)
 Worldwide (English)